Introduction
In today’s fast-paced digital world, our iPhones are more than just communication tools—they are repositories of our personal information, from photos and messages to financial details and more. There comes a time, whether due to upgrading to a newer model, addressing a software issue, or selling the device, when erasing your iPhone becomes necessary. This comprehensive guide will walk you through the steps to securely and effectively erase your iPhone, ensuring your personal information is protected.
Understanding the Importance of Erasing Your iPhone
Before we delve into the “how-to,” it’s crucial to understand why properly erasing your iPhone is important. When you erase your iPhone, you’re doing more than just deleting personal files—you’re wiping the slate clean, removing all settings, applications, and data stored on the device. This process is essential for safeguarding your privacy, especially if you’re passing the device on to someone else. It ensures that the next user cannot recover any of your personal information.
Preparing Your iPhone for Erasure
Back Up Your Data
Before erasing all the data on your iPhone, ensure you have a backup of everything you wish to keep. You can back up your iPhone using iCloud or your computer. iCloud backups are stored in the cloud and can be accessed anytime with your Apple ID, while backups made to a computer require physical access to that computer to restore.
Sign Out of Apple ID and iCloud
Signing out of your Apple ID and iCloud is a critical step before erasing your iPhone. This step ensures that your device is no longer linked to your Apple ID, which could otherwise lock the device for future users via Activation Lock. To sign out, go to Settings, tap your name, scroll down, and tap “Sign Out.” Enter your Apple ID password and choose whether to keep a copy of your data on the device. Since you’ll be erasing everything, you can choose not to keep a copy.
Turn Off Find My iPhone
“Find My iPhone” is a security feature that helps you locate your device if it’s lost or stolen. However, it needs to be turned off before you can erase your iPhone. This can be done by going to Settings, tapping your name, then “Find My,” and switching off “Find My iPhone.” You’ll be prompted to enter your Apple ID password to confirm this action.
Erasing Your iPhone
Using Settings to Erase Your iPhone
Once you’ve backed up your data and signed out of your Apple ID and iCloud, you’re ready to erase your iPhone. This is a straightforward process:
- Open the Settings app on your iPhone.
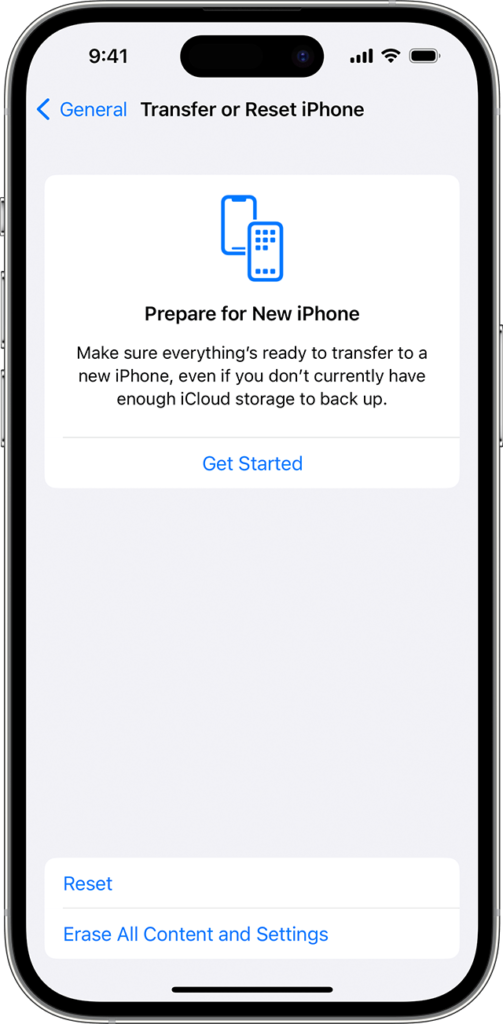
- Tap “General,” then scroll down and tap “Reset.”
- Select “Erase All Content and Settings.” If you’ve set a passcode or restrictions, you’ll be asked to enter it.
- Confirm your choice to erase everything. Your iPhone will then begin the erasure process, which may take a few minutes to complete.
Using a Computer to Erase Your iPhone
If you prefer or if your iPhone isn’t starting correctly, you can erase it using a computer:
- Connect your iPhone to the computer using a USB cable.
- If you’re using a Mac running macOS Catalina or later, open Finder. On a Mac with macOS Mojave or earlier, or on a Windows PC, open iTunes.
- Locate your device on your computer and select it.
- Choose “Restore iPhone.” Confirm your choice, and the computer will begin erasing your iPhone and installing the latest iOS software.
After Erasing Your iPhone
Once the erasure process is complete, your iPhone will restart as if it were new, displaying the “Hello” screen. At this point, the device is ready to be set up by a new user. If you’re passing the iPhone to someone else, it’s now safe to do so, as all your personal information has been removed.
Conclusion
Erasing your iPhone is a straightforward process, but it’s crucial for protecting your privacy. Whether you’re upgrading, selling, or recycling your device, following these steps ensures that your personal information remains secure. Always remember to back up your data before starting the erasure process, so you don’t lose anything important. With your iPhone now erased, you can confidently move on to your next device, knowing your data is secure.

